If your internet plan has monthly data instead of unlimited data, your internet speed may be "shaped" if you use all your monthly data.
This information does not apply to TPG Mobile.
Select one of the links below to jump to a query:
Speed shaping
If your internet plan has monthly data instead of unlimited data, your internet speed may be "shaped" if you use all your monthly data.
A "shaped" service has a slower download and upload speed. You can look up your plan's shaped speed in your plan's Critical Information Summary.
Shaping is automatically removed at the start of your next billing period when your monthly data resets.
How to check your data usage
You can check your data usage in My Account. Data usage is not available in My Account for unlimited data services.
My Account will also tell you:
- If your plan has anytime data or peak/off-peak data (and when the peak/off-peak periods start and end)
- When your monthly data resets
Anytime data vs. Peak/Off-peak data
Anytime data can be used at any time.
Peak/Off-peak data means you have two separate types of monthly data - one that can be used during the peak period, and one that can used during the off-peak period.
Peak/Off-peak data is also shaped separately. If you use all your Peak data, you'll be shaped during the peak periods but not during the off-peak period.
Data usage guide
As a rough guide, 1GB of data usage will let you:
- Receive 1000 emails
- Surf the web for 20 hours
- Watch 5 four-minute YouTube videos
- Download 20 four-minute music tracks
- Download 40 photos.
Your usage may vary. This guide assumes 100KB per email, web browsing at 30MB per hour, YouTube videos at 24MB per video (360p quality), music at 4MB per track, and 2MB per photo.
Are websites not loading properly? If your modem seems to be online but you're having trouble browsing the web, these steps will help identify the issue.
-
Is the problem with all websites, or just one? If you can't browse to a single website but others work fine, switch to Troubleshoot a single website.
-
Make sure the device you're using is connected to your modem by Ethernet cable or Wi-Fi.
-
Check your modem's barcode sticker for a default gateway address, e.g. "http://192.168.1.1". Some modems have vanity addresses that include the manufacturer's name, like "http://tplinkmodem.net".
Can't find the default gateway address? Try this guide for Windows or Mac computers.
-
Enter your modem's default gateway address in your web browser and see if a login screen comes up. If you see a login screen, this means your device is definitely connected to your modem.
Can't browse to your modem's default gateway? Switch to No Communication Between Modem and Device. -
Clear your browser cache, then try to view a website. Here are guides for popular browsers:
- Mozilla Firefox Clear cache
- Google Chrome Clear cache & cookies
- Apple Safari Clear history, cache & cookies
- Microsoft Edge Manage and clear cache -
Run a scan on your antivirus/anti-malware software.
If any infections are detected, make sure they are quarantined and removed. Contact your software’s Customer Support if you need help. -
Does your antivirus/anti-malware software use a firewall? Temporarily disable the firewall and try to go to a website.
Contact your software’s Customer Support if you need help to disable a firewall, or changing your firewall settings to allow web browsing.
-
Follow this guide to ping the address "google.com".
If the ping test worked, try resetting your browser:
- Mozilla Firefox Refresh to default settings
- Google Chrome Reset to default
- Apple Safari Remove all website data
- Microsoft Edge currently can't be reset, please use a different browser. -
Couldn't ping "google.com"? Try pinging "203.12.160.35" instead.
If you can ping "203.12.160.35", your device probably has the wrong DNS server. Try manually setting your DNS server. -
Can't ping "203.12.160.35"? There may be an issue with the TCP/IP settings in your computer. Try resetting your TCP/IP settings.
-
Still can't view websites? Call us on 13 14 23 and we'll help you.
If your modem's default gateway address is starting with “169.254”, then resetting your network adapter to default settings may help fix the issue.
This process may also be known as a "winsock reset", or "comms reinstall".
Select one of the links below to jump to a query:
Winsock Reset for Windows
-
Click the Search icon (magnifying glass) in the bottom left-hand corner of the screen and type "cmd" into the search bar.

-
Right-click on the Command Prompt app and select Run as administrator.
You may need to enter an administrator password before you can continue.
-
Type “netsh winsock reset” and then hit Enter on your keyboard.
You’ll see the message “Winsock reset completed successfully” when it's done.
-
Restart your computer to finish.
Network restart for macOS
Mac OSX and macOS don't have Winsock, but you can try restarting your network.
-
Hit the Network icon in the top right-hand corner, then select Turn Wi-Fi/Airport Off.

-
Wait 1-2 minutes, then hit Network > Turn Wi-Fi/AirPort On.

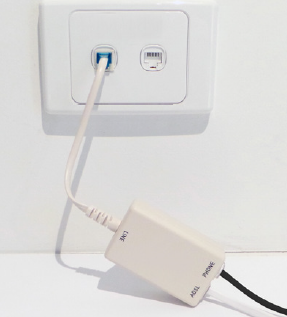
If you’re plugging in a telephony device into a socket without a modem, skip steps 1 and 2.
-
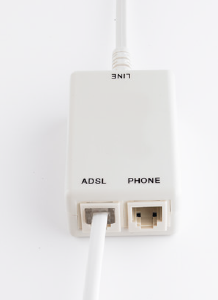
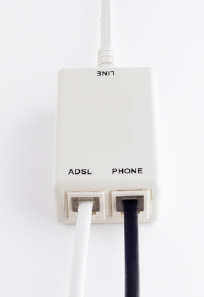
Take one end of a phone cable and plug it into your modem’s ADSL socket.

-
Plug the other end of the phone cable into the port labelled ADSL on your line filter.
-
Using another phone cable, plug one end into the appropriate socket on your telephony device (please consult the device’s manual if you’re not sure which socket this is).
-
Plug the other end of the phone cable into the port labelled PHONE on your line filter.
-
Plug the filter into your wall socket to finish.
Appendix - More information
Which devices need to be filtered?
- A modem that’s sharing a wall socket with any of the devices listed below
- All telephony devices including telephones and fax machines
- Foxtel Digital units (these are plugged into a coaxial socket AND a telephony socket)
- EFTPOS machines
Modems that aren’t sharing the same wall socket with another telephony device should not be filtered. Simply connect the ADSL port straight into the wall socket using an RJ-11 phone cable.
Does the plug fit?
If your home has the older 600-series wall sockets (typical plug is a yellow square with 3 prongs), you’ll need to purchase an adapter that allows you to plug in a modern RJ11 phone cable. These adapters can be bought at all good electronics and computer stores.
Do I need a Central Splitter?
- If you have more than three telephony devices or a Monitored/Back to Base Alarm system, you’ll need a central splitter.
- Please contact an licensed cabler who is registered with an ACMA-accredited registrar about installing a central splitter. This is an electrician who is properly licensed to work on telecommunications cables.
- Without a central splitter, it is likely that you will suffer phone and/or internet dropouts caused by interference between your modem and telephony devices.
Here's everything you need to know about the different features available for nbn Home Phone, a VoIP phone service exclusive to nbn FTTP. VoIP phone services work over the internet.
This product was only available to select nbn FTTP customers as of 23 August 2017. It is no longer sold as of 23 May 2024.
Select one of the links below to jump to a query:
- Call Barring
- Number Display/Number Block
- Directory Listing
- Call Forwarding/Diverting
- Call Waiting
- Caller ID
Call Barring
Call Barring stops your TPG Voice service from making specific types of calls.
All Call Barring types are turned off by default, but you have these options:
- Bar outgoing long distance (STD) calls
- Bar outgoing calls to Australian mobile phones
- Bar outgoing International calls
-
Log in to My Account and hit View nbn Home Phone Service Account.
Note: You may see a View nbn Digital Voice Service Account button instead.
-
Hit nbn Home Phone Service Control Panel.
-
Under "Call Barring", you can change each type of call barring to barred if you want to turn it on, or not barred if you want to turn it off.

Number Display/Number Block
Number Display/Number Block blocks your phone number from being shown to the person you’re calling.
Number Display/Number Block is turned off by default.
-
Log in to My Account and hit View nbn Home Phone Service Account.
Note: You may see a View nbn Digital Voice Service Account button instead.
-
Hit nbn Home Phone Service Control Panel.
-
Under "Number Display/Number Block", you can change the option to blocked if you want to turn it on, or displayed if you want to turn it off.

Directory Listing
Directory Listing changes the way your TPG phone number is listed in public directories like the White Pages and Directory Assisted Services:
- Listed: Your name, phone number and address are listed in directories.
- Silenced: Your phone number is not listed in directories.
Directory Listing is set to Silenced by default.
-
Log in to My Account and hit View nbn Home Phone Service Account.
Note: You may see a View nbn Digital Voice Service Account button instead.
-
Hit nbn Home Phone Service Control Panel.
-
Under "Directory Listing", you can change the option to listed if you want your phone number to be listed in directories, or silenced if you don't want to be in directories.
Any changes may take up to 5 business days to show on directories.
Call Forwarding/Diverting
Call Forwarding lets you divert calls to TPG Voice number to a different Australian phone number. Standard rates apply for all forwarded calls.
Note: You can't forward calls to an international number.
All Call Forwarding/Diverting types are turned off by default, but you have these options:
- Divert all incoming calls
- Divert if no reply (after 4-39 seconds)
- Divert if busy
-
Log in to My Account and hit View nbn Home Phone Service Account.
Note: You may see a View nbn Digital Voice Service Account button instead.
-
Hit nbn Home Phone Service Control Panel.
-
Under "Call Forwarding/Diverting", enter a destination phone number to turn that type of call forwarding on.
For Divert if no reply, you'll also need to enter a Delay time between 4-39 seconds.
Call Waiting
If someone calls you while you’re already on a call, Call Waiting lets you to put them on hold. To use Call Waiting your phone needs to have a "Recall" of "Flash" button.
Call Waiting is turned on by default and currently, it can't be turned off in My Account.
Caller ID
Caller ID lets you see the phone number of the person who's calling you. It's included by default.
nbn Home Phone is a VoIP phone service that works over the internet.
Note: This product was only available to select nbn FTTP customers as of 23 August 2017. It is no longer sold as of 23 May 2024.
Select one of the links below to jump to a query:
- Set up nbn® Home Phone
- Troubleshoot your nbn® Home Phone calls
- Troubleshoot call dropouts on your nbn® Home Phone
Set up nbn® Home Phone
- First, make sure you’ve got a message from us asking you to plug in your nbn modem. We need to get your connection ready on our side before you plug in.
- Find your nbn Connection Box (NCB) – this is usually installed on the inside of an exterior wall in your home, sometimes in the garage.
- Use a phone cable to plug your phone into the NCB's UNI-V1 port.
If you need you use the UNI-V2 port instead, we'll let you know.
- (Optional) Some homes have smart wiring, where internal Ethernet cables have been installed by an ACMA-approved electrician. If this is the case, you'll have Ethernet sockets on the wall near your NCB, and in other rooms of your home.
You can use additional RJ11 phone cables to connect your NCB's UNI-V1 port to the Ethernet wall socket near your NCB, then plug your phone into the corresponding Ethernet wall socket in another room.
Note: The UNI-V port should never be connected to a network switch or router.
Troubleshoot your nbn® Home Phone calls
If you can't make or get calls on your nbn Home Phone service, these steps will help you identify the issue.
-
Is your internet working? Your phone service can't work without internet.
You can check your address for an internet outage or planned maintenance on nbn®'s Network status and outages page and our Network Status page. - Find your nbn Connection Box (NCB) and make sure your phone and all cables are plugged in securely and not damaged.
You’ll need to replace any broken or chewed cables. If your phone is damaged, please replace it or contact the seller for a warranty claim.
-
Make sure your phone has power.
Wireless phones may have batteries that need to be recharged or replaced. -
Does your home have smart wiring? Some homes have smart wiring, where you'll have Ethernet sockets on the wall near your NCB, and in other rooms of your home.
If your phone is plugged in via smart wiring, unplug it and plug it directly into your NCB's UNI-V1 port, then make a test call.
Note: If your nbn Home Phone is already set up to use the UNI-V2 port, use that port instead.
If calls work when your phone is plugged into the nbn Connection Box but not when it's plugged in via smart wiring, there may be a problem with your smart wiring that needs to be repaired by an ACMA-licensed electrician.
-
Turn off your NCB’s power outlet for at least 5 minutes.
- Turn the outlet back on and wait for your nbn modem’s Internet light to come on, then make a test call.

-
Still can’t make or get calls? Use another phone to call us on 1300 997 271 or contact us on our Live Chat and we'll help you.
Troubleshoot call dropouts on your nbn® Home Phone
If your nbn Home Phone is having call dropouts, it means your calls will disconnect unexpectedly. These steps will help you identify the issue.
-
Is your internet dropping out? Your phone service can't work without internet.
You can check your address for an internet outage or planned maintenance on nbn®'s Network status and outages page and our Network Status page. -
Find your nbn Connection Box (NCB) and make sure your phone and all cables are plugged in securely and not damaged.
You’ll need to replace any broken or chewed cables. If your phone is damaged, please replace it or contact the seller for a warranty claim.
-
Are you using a wireless phone? Make sure that your phone's battery is charged, and that you're staying within range of the phone's base station during the call.
-
Does your antivirus/anti-malware software use a firewall? Temporarily disable the firewall and make a test call. If the dropouts stop, then the firewall may be blocking the internet traffic for your VoIP phone calls.
Contact your software’s Customer Support if you need help to disable a firewall, or changing your firewall settings to allow VoIP calls.
-
Does your home have smart wiring? Some homes have smart wiring, where you'll have Ethernet sockets on the wall near your NCB, and in other rooms of your home.
If your phone is plugged in via smart wiring, unplug it and plug it directly into your NCB's UNI-V1 port, then make a test call.
Note: If your nbn Home Phone is already set up to use the UNI-V2 port, use that port instead.
If calls are fine when your phone is plugged into the nbn Connection Box but they drop out when it's plugged in via smart wiring, there may be a problem with your smart wiring that needs to be repaired by an ACMA-licensed electrician.
-
Still getting call dropouts? Use another phone to call us on 13 14 23 or contact us on our Live Chat and we'll help you.
If your TPG Voice service is having call dropouts, it means your calls will disconnect unexpectedly. These steps will help you identify the issue.
TPG Voice is a VoIP phone service that works over the internet.
-
Is your internet dropping out? Your phone service can't work without internet.
You can check your address for an internet outage or planned maintenance on our Network Status page. -
Find your modem and make sure your phone and all cables are plugged in securely and not damaged.
You’ll need to replace any broken or chewed cables. If your phone is damaged, please replace it or contact the seller for a warranty claim.
-
Are you using a wireless phone? Make sure that your phone's battery is charged, and that you're staying within range of the phone's base station during the call.
-
Does your antivirus/anti-malware software use a firewall? Temporarily disable the firewall and make a test call. If the dropouts stop, then the firewall may be blocking the internet traffic for your VoIP phone calls.
Contact your software’s Customer Support if you need help to disable a firewall, or chaging your firewall settings to allow VoIP calls.
-
Still getting call dropouts? Use another phone to call us on 13 14 23 or contact us on our Live Chat and we'll help you.
If you can't make calls using your TPG Voice service, these steps will help you identify the issue.
TPG Voice is a VoIP phone service that works over the internet.
-
Is your phone service still new? We'll send you and email and SMS when it's ready to use.
If you're moving an existing phone number to TPG: After your internet is connected, it can take up to 5 days to transfer your number. During this time you can make calls using a temporary number, but you won't get calls. -
Is your internet working? Your phone service can't work without internet.
You can check your address for an internet outage or planned maintenance on our Network Status page. - Find your modem and make sure your phone and all cables are plugged in securely and not damaged.
You’ll need to replace any broken or chewed cables. If your phone is damaged, please replace it or contact the seller for a warranty claim.
-
Make sure your phone has power.
Wireless phones may have batteries that need to be recharged or replaced. -
Turn off your modem’s power outlet for at least 5 minutes.
-
Turn the outlet back on and wait for your modem’s Internet light to come on, then see if you can make a call.

-
Are you calling an International number? Make sure that the number is dialled correctly:
- The dialling code should replace the first zero in a mobile number. For example, a London mobile number "07937123123" should be "+447937123123".
- If the first digit of the mobile number is not a zero, then just put the dialling code before the entire mobile number.
Note: Calling cards which ask you to dial an access code before an international number will not work with nbn Home Phone & TPG Voice services. -
Are you calling a High Risk Destination? Calls to these destinations are blocked by default.
If you need to call a High Risk Destination, please call us on 13 14 23. -
Still can’t make calls? Use another phone to call us on 13 14 23 or contact us on our Live Chat and we'll help you.
Here's what you need to know about the features available for your TPG Voice service, a VoIP phone service that works over your nbn connection.
Note: TPG Voice doesn't have a voicemail feature.
Select one of the links below to jump to a query:
- Call Barring
- Number Display/Number Block
- Directory Listing
- Call Forwarding/Diverting
- Call Waiting
- Caller ID
Call Barring
Call Barring can stop your phone service from making specific types of calls.
All Call Barring types are turned off by default, but you have these options:
- Bar outgoing long distance (STD) calls
- Bar outgoing calls to Australian mobile phones
- Bar outgoing International calls
-
Log in to My Account.
Never used My Account before? Check out An Introduction to My Account. -
Hit View NBN Digital Voice Service Account.

-
Hit NBN Digital Voice Service Control Panel.
-
Under "Call Barring", you can change each type of call barring to barred if you want to turn it on, or not barred if you want to turn it off.
Number Display/Number Block
Number Display/Number Block blocks your phone number from being shown to the person you’re calling.
Number Display/Number Block is turned off by default.
-
Log in to My Account.
Never used My Account before? Check out An Introduction to My Account. -
Hit View NBN Digital Voice Service Account.
-
Hit NBN Digital Voice Service Control Panel.
-
Under "Number Display/Number Block", you can change the option to blocked if you want to turn it on, or displayed if you want to turn it off.
Directory Listing
Directory Listing changes the way your TPG phone number is listed in public directories like the White Pages and Directory Assisted Services:
- Listed: Your name, phone number and address are listed in directories.
- Silenced: Your phone number is not listed in directories.
Directory Listing is set to Silenced by default.
-
Log in to My Account.
Never used My Account before? Check out An Introduction to My Account. -
Hit View NBN Digital Voice Service Account.
-
Hit NBN Digital Voice Service Control Panel.
-
Under "Directory Listing", you can change the option to listed if you want your phone number to be listed in directories, or silenced if you don't want to be in directories.
Any changes may take up to 5 business days to show on directories.
Call Forwarding/Diverting
Call Forwarding lets you divert calls to TPG Voice number to a different Australian phone number. Standard rates apply for all forwarded calls.
Note: You can't forward calls to an international number.
All Call Forwarding/Diverting types are turned off by default, but you have these options:
- Divert all incoming calls
- Divert if no reply (after 4-39 seconds)
- Divert if busy
-
Log in to My Account.
Never used My Account before? Check out An Introduction to My Account. -
Hit View NBN Digital Voice Service Account.
-
Hit NBN Digital Voice Service Control Panel.
-
Under "Call Forwarding/Diverting", enter a destination phone number to turn that type of call forwarding on.
For Divert if no reply, you'll also need to enter a Delay time between 4-39 seconds.
Call Waiting
If someone calls you while you’re already on a call, Call Waiting lets you to put them on hold. To use Call Waiting your phone needs to have a "Recall" of "Flash" button.
Call Waiting is turned on by default and currently, it can't be turned off in My Account.
Caller ID
Caller ID lets you see the phone number of the person who's calling you. It's included by default.
If the phone with yourTPG Mobile SIM got lost or stolen, we can turn on IMEI Blocking so the phone can't be used on any Australian network, except to call emergency services.
Select one of the links below to jump to a query:
How to turn IMEI Blocking on
- Just call us on 1300 997 273. If you're not the account holder, then get the account holder to call us instead.
- Your request may take up to 24 hours to complete.
Note: We also recommend ordering a replacement SIM so you can use your TPG Mobile service in a different phone.
How to turn IMEI Blocking off
If you get your phone back, follow these steps:
- Get your phone's IMEI Number by calling *#06# from your phone. The IMEI Number will be shown on your phone screen.
An International Mobile Equipment Identity (IMEI) Number is a unique code assigned to your phone. It will also be printed on your phone's barcode sticker or the SIM tray, if your phone has one:
- Call us on 1300 997 273. If you're not the account holder, then get the account holder to call us instead.
- Your request may take up to 24 hours to complete.