Here's everything you need to know about the different features available for TPG Mobile. You can manage these features through My Account, and Quick Codes that you can dial from your phone.
Note: Premium calls and SMS/MMS services are not available on TPG Mobile.
Select one of the links below to jump to a query:
- Voicemail
- How to get your Voicemail messages
- How to turn Voicemail on or off
- How to set up Voicemail for the first time
- How to change the way you get Voicemail notifications
- Do Voicemail messages expire?
- Call Barring
- Call Forwarding
- Manage all types of Call Forwarding in My Account
- Manage Call Forwarding Always with Quick Codes
- Manage Call Forwarding if Busy with Quick Codes
- Manage Call Forwarding if Unreachable with Quick Codes
- Manage Call Forwarding if No Reply with Quick Codes
- Caller ID
- Call Waiting
- Extend your mobile ring time
Voicemail
How to get your Voicemail messages
- Call 121 from your mobile handset.
- Alternatively, call 0414121121 from another phone and follow the prompts. Enter your mobile number and voicemail PIN.
- While overseas, call +61414121121 and follow the prompts. Enter your mobile number and voicemail PIN.
How to turn Voicemail on or off
-
Log in to My Account and hit Settings.
-
Use the Voicemail ON/OFF switch to turn Voicemail on or off. Changes will be saved automatically but may take up to 5 minutes to apply.
Note: To fully turn off Voicemail, you'll also need to dial "##002#" from your handset to disable all call forwarding to Voicemail.
How to set up Voicemail for the first time
-
Call 121 from your mobile handset.
-
Follow the prompts to set your 4 to 10-digit voicemail PIN. You'll need this PIN to get your voicemail using another phone.
-
Record your name to personalise the standard greeting.
-
Choose your state/territory to set your time zone.
-
(Optional) Hold the line and follow the prompts to set a custom voicemail greeting or change the way your get Voicemail notifications.
SMS alerts are enabled by default. -
Hang up to finish.
How to change the way you get Voicemail notifications
- SMS Alert - Dial 1218 from your mobile handset to enable/disable.
- Ring Alert - No longer available as of 12 March 2024.
- Visual Voicemail (iPhones only) - Dial 1217 from your iPhone to enable/disable. You can manage your Visual Voicemail from your iPhone.
Do Voicemail messages expire?
Yes. New voicemail messages and messages saved in your mailbox will expire after 7 days. If you need to keep a message, you can save it for a further 7 days by pressing 2 while listening to the message. Once a message has expired it’s permanently erased and can’t be recovered.
Call Barring
Call Barring can stop your mobile service from being able to make any calls, or just International calls.
-
Log in to My Account and hit Settings.
-
Hit the + (plus) icon next to Call Barring.

-
Use the ON/OFF switches for Bar All Outgoing Calls or Bar All Outgoing International Calls as desired. Changes will be saved automatically but may take up to 5 minutes to apply.

Call Forwarding
Call Forwarding will forward calls to your mobile number to a different phone number according to these rules:
- Forward all calls
- Forward if busy
- Forward if no reply
- Forward if unreachable
Note: Standard call costs may apply when any call is forwarded, unless it's forwarded to Voicemail.
Manage all types of Call Forwarding in My Account
-
Log in to My Account and hit Settings.
-
Hit the + (plus) icon next to Call Forwarding.

-
Adjust the ON/OFF switches for Divert All Calls, Divert if Busy, Divert if No Reply, or Divert if Unreachable as desired.
-
To change where calls are forwarded to for each type of call forwarding, hit Edit and enter the phone number in the Divert To text box, then hit Save. Changes may take up to 5 minutes to apply.

Manage Call Forwarding Always with Quick Codes
- To check if Call Forwarding Always is on or off, dial *#21# from your phone.
- To turn on Call Forwarding Always, dial **21* before the number you want to forward calls to, followed by #.
- To turn off Call Forwarding Always, dial #21#.
Manage Call Forwarding if Busy with Quick Codes
- To check if Call Forwarding if Busy is on or off, dial *#67# from your phone.
- To turn on Call Forwarding if Busy, dial **67* before the number you want to forward calls to, followed by #.
- To turn off Call Forwarding if Busy, dial #67#.
Manage Call Forwarding if Unreachable with Quick Codes
- To check if Call Forwarding if Unreachable is on or off, dial *#62# from your phone.
- To turn on Call Forwarding if Unreachable, dial **62* before the number you want to forward calls to, followed by #.
- To turn off Call Forwarding if Unreachable, dial #62#.
Manage Call Forwarding if No Reply with Quick Codes
- To check if Call Forwarding if No Reply is on or off, dial *#61# from your phone.
- To turn on Call Forwarding if No Reply, dial **61* before the number you want to forward calls to, followed by #.
- To turn off Call Forwarding if No Reply, dial #61#.
Caller ID
Caller ID allows you to change the way your mobile phone number is displayed when you are calling someone.
- You can turn Caller ID on or off in My Account, or by dialling 1571 from your phone.
- To hide your phone number for one call only, dial 1831 before the number you're calling.
- To show your phone number for one call only, dial 1832 before the number you're calling.
-
Log in to My Account and hit Settings.
-
Hit the + (plus) icon next to Caller ID.

-
Adjust the ON/OFF switches for Send Calling Line Identification and/or Calling Line Identification Display as desired. Changes will be saved automatically but may take up to 5 minutes to apply.

Call Waiting
Call Waiting will play a tone if you get another call while you're already in a call. You can swap between two calls - if you get a third call, you'll need to hang up one of the first two calls.
- To check if Call waiting is on or off, dial *#43#.
- To turn on Call Waiting, dial *43#.
- To turn off Call Waiting, dial #43#.
Extend your mobile ring time
You can extend the ring time for incoming mobile calls to a maximum of 30 seconds, in increments of 5 seconds.
Dial **61*121** before the number of seconds to ring (e.g. 20, 25 or 30), followed by #.
When you change your TPG Mobile plan, your new plan will kick in at the start of your next billing period. If your next billing period begins in less than 7 days, your new plan will kick in at the start of the following billing period instead.
Important: If you submit multiple plan changes, you may override your previous plan change.
-
Log in to My Account and hit Change Plan.
Never used My Account before? Check out An Introduction to My Account. -
Under "Want to try a new plan?", hit Change Plan.

-
Choose your new plan from the list of available options. Take note of the date your plan change will happen, then hit Next.

-
You'll see a summary of your plan change. If you have a promo code, enter it and hit Apply.
-
Tick the box to agree to the terms and conditions and then hit Submit.

-
We'll send you an email and SMS to confirm when your plan change is done.
Are most websites fine but you can't get to one website? These steps will help identify the issue.
-
The website may just be affected by an outage or planned maintenance. You can check the website on Is It Down Right Now? or Down For Everyone or Just Me.
If the website has an outage or planned maintenance, you'll need to wait until it's over. -
Clear your browser cache, then try to view the website. Here are guides for popular browsers:
- Mozilla Firefox Clear cache
- Google Chrome Clear cache & cookies
- Apple Safari Clear history, cache & cookies
- Microsoft Edge Manage and clear cache -
Try visiting the website on a different web browser, like Mozilla Firefox or Google Chrome.
If a different web browser works, try resetting your browser:
- Mozilla Firefox Refresh to default settings
- Google Chrome Reset to default
- Apple Safari Remove all website data
- Microsoft Edge currently can't be reset, please use a different browser. -
Run a PingPlotter test for the website and keep the results handy. We'll need them to investigate your issue.
-
Still can't go to the website? Call us on 13 14 23 and we'll help you.
Here’s how you can set up a compatible bring-your-own (BYO) modem for TPG nbn Wireless.
Your nbn Phone service and included calls are not available if you use a BYO modem.
Select one of the links below to jump to a query:
Modem compatibility
To work on TPG nbn Wireless, your modem must:
- Be nbn-ready and able to support your nbn plan speed
- Support PPPoE connections by Ethernet WAN
For a list of modems tested by our team, see nbn BYO modem requirements.
General nbn® Wireless setup guide for any modem
All modems are different. If this advice doesn’t work for your modem, check the manufacturer’s website for a guide on how to plug in and enter the TPG settings.
- Find your nbn Connection Box (NCB) – this will be installed near the wall socket that connects to your nbn Wireless antenna. Unplug any old modem from the nbn Connection Box and power outlet.
- Use an Ethernet cable to connect your modem's WAN or LAN/WAN port to your NCB's UNI-D1 port.
Our email/SMS will tell you if you need to use a different UNI-D port. - Use the power cable to connect your modem's Power port to a power outlet, then turn it on.
If your modem has a power button or switch, turn it on.
- Connect a device to your modem. You can use an Ethernet cable to connect a device to one of the LAN or Ethernet ports, or connect via WiFi.
The default WiFi name (SSID) and password can be found on your modem’s barcode sticker.
- On your connected device, open your web browser and go to your modem’s gateway address (e.g. http://192.168.1.1). The gateway address and login details can be found on the barcode sticker.
Modems may have a login username and password, or just a password.
- Make sure your modem has the following settings. If you’re not sure how to do this, check the manufacturer’s website for a guide.
Mode/Modulation: WAN
Connection Type: PPPoE
- You’ll need to enter your TPG username and password for the PPPoE connection. Your username is in emails from us about your TPG order, and on your TPG invoice.
If you forgot your password, you can reset it. - Save your settings and wait 5-10 minutes for your modem to connect.
- You should now be online. If you can’t view a website or notice a red or unlit Internet light on your modem, call us on 1300 997 271 for help.
We’re fully trained on TPG modems, but please note that there may be limited support for your BYO modem.
Check the manufacturer's website for a setup guide on how to plug in and enter the TPG Broadband Settings.
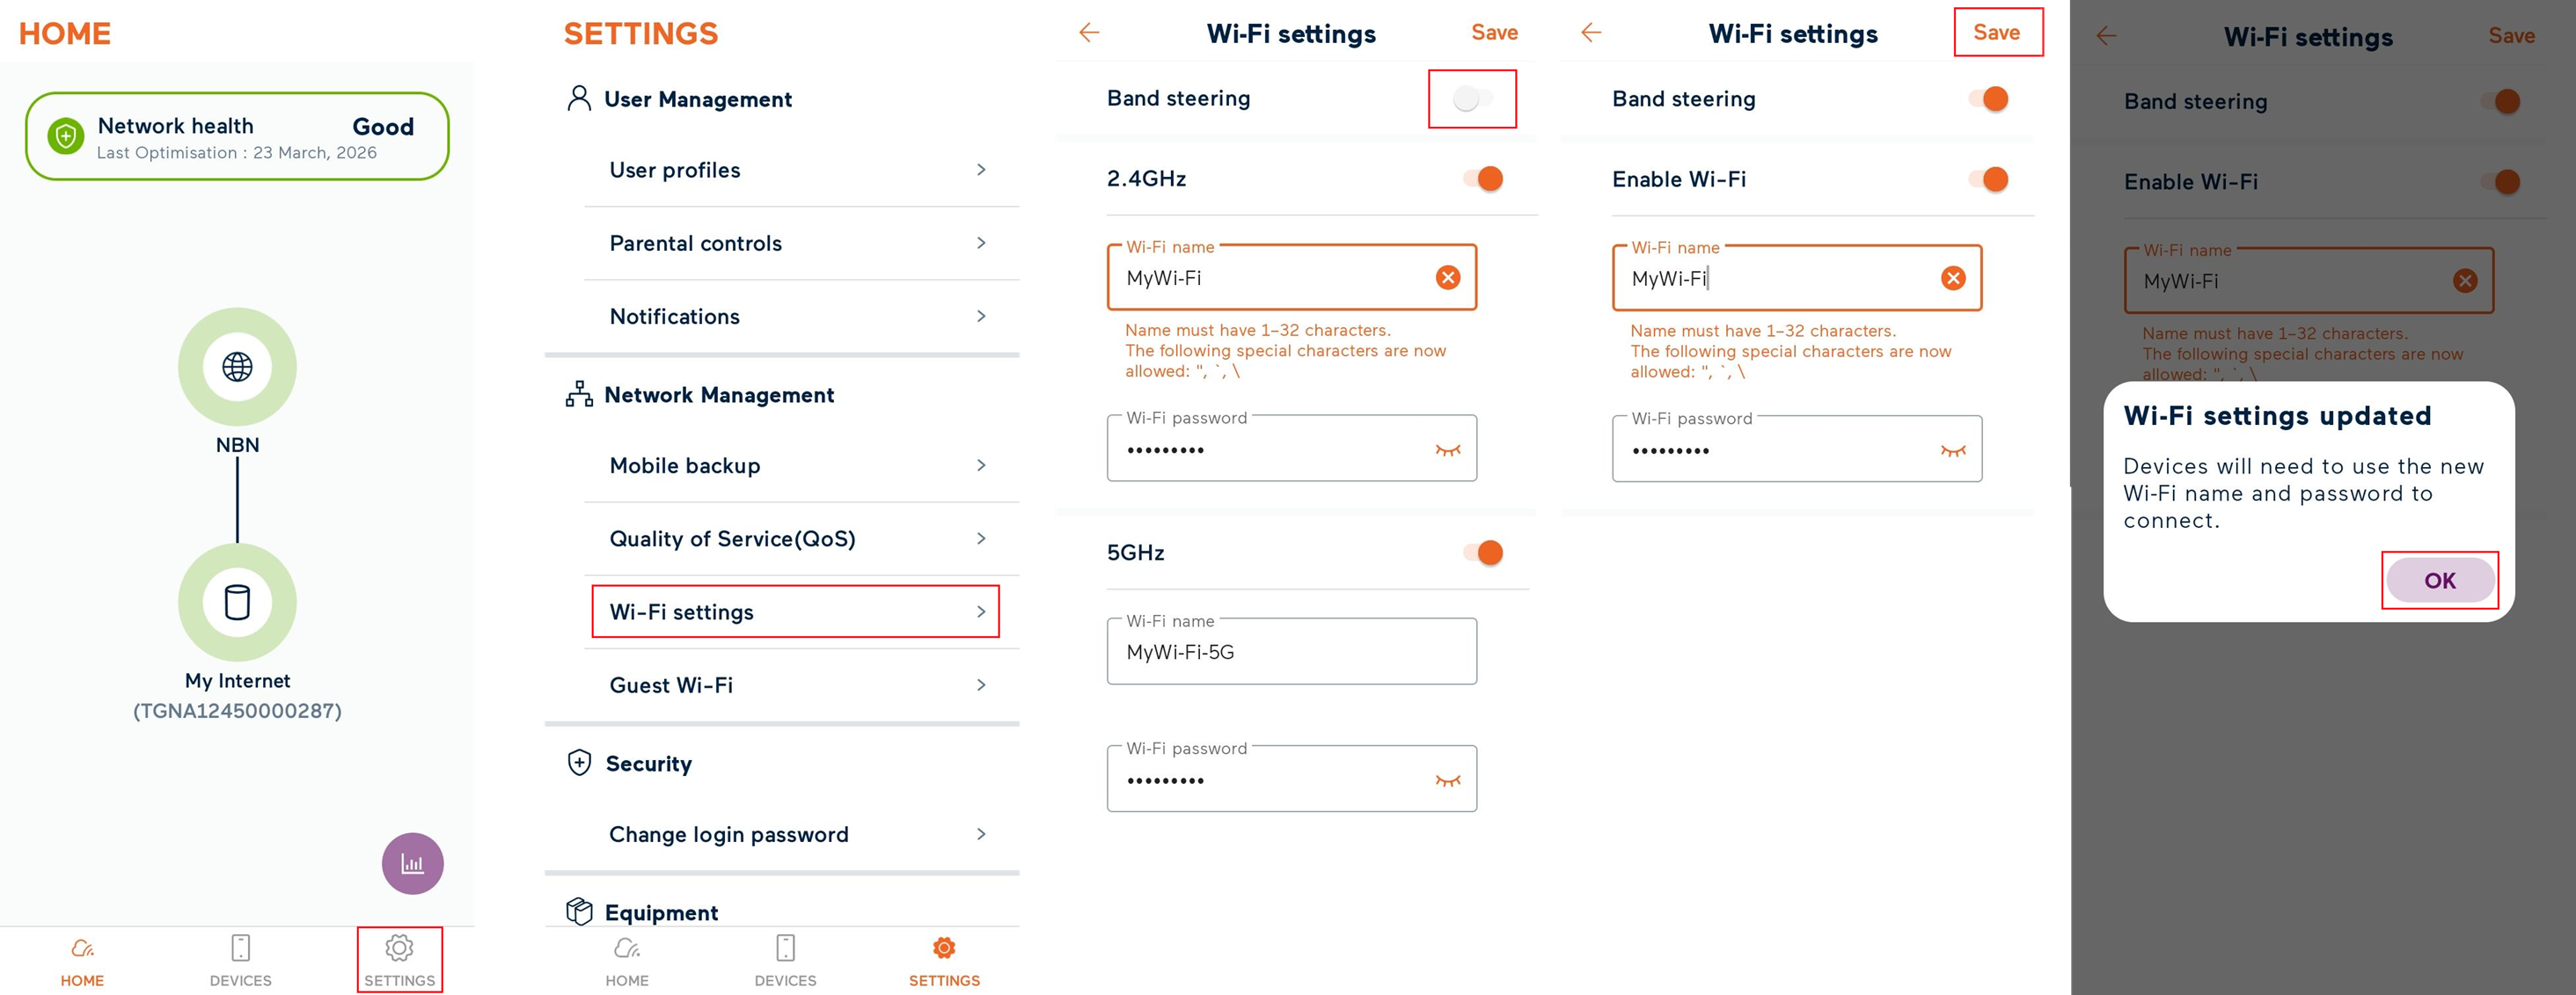
Here's how to check your basic Wi-Fi settings on a TPG modem. This will make sure Wi-Fi is turned on, confirm your Wi-Fi name and password, make sure your Wi-Fi name isn't hidden, and make sure any band steering is turned on.
Band steering is a feature that lets your devices automatically switch between 2.4GHz Wi-Fi and 5GHz Wi-Fi for the best Wi-Fi signal.
Don't have a TPG modem? Check the manufacturer's website for a guide.
Choose your modem:


Basic Wi-Fi settings on a Wi-Fi Max Modem
From the My Internet Connect App
Don't want to use the app? You can do it in your web browser.
- Open the My Internet Connect App and tap Settings.
- Under Network Management, select Wi-Fi settings.
- By default, Band Steering will be toggled ON, and you'll see one set of Wireless settings which will be applied to both the 2.4GHz and 5GHz Wi-Fi networks.
Note: If Band Steering is turned OFF, you will see separate 2.4GHz and 5GHz settings, and your devices will not automatically switch between the 5GHz/2.4GHz Wi-Fi networks depending on the best available signal. - Make sure that Enable Wi-Fi or the 2.4GHz and 5GHz options are toggled ON .
- On these pages, you'll also find the Wi-Fi name and Wi-Fi password.
- If you made any changes, click Save, then OK to finish.
From the Modem Dashboard
- Open your web browser and go to: https://192.168.1.1
- Log in with the Login Password found on the modem's barcode sticker or use your custom password.

- From the left pane, click Wi-Fi.
- By default, Band Steering will be toggled ON, and you'll see one set of Wireless settings which will be applied to both the 2.4GHz and 5GHz Wi-Fi networks.
If Band Steering is turned OFF, you will see separate 2.4GHz and 5GHz settings, and your devices will not automatically switch between the 5GHz/2.4GHz Wi-Fi networks depending on the best available signal. - Make sure that MLO Enable is toggled ON.
This feature allows devices to use multiple frequency bands for better performance. - Make sure that Wi-Fi Enable is toggled ON.
- Make sure that Hide Wi-Fi Network is toggled OFF. If the Wi-Fi network is hidden, then your Wi-Fi network name(s) won't show up in the list of available networks when you try to connect.
- If you made any changes, click Save to finish.

Basic Wi-Fi settings on a NetComm NL20 Modem
- Open your web browser and go to: http://192.168.1.1.
- Log in with the Username and Password found on the modem's barcode sticker or use your custom password.

- In the left pane, click Wireless.
- Select the 2.4GHz or 5GHz radio button.
- Make sure that Main is On, then select More Settings.

- Make sure that Hide SSID is Off.
- Make sure that 802.11ax-mode is On.
Note: You can enable WPS by selecting the On radio button next to WPS Function. - If you made any changes, hit Apply.

Basic Wi-Fi settings on a Wi-Fi Max 5G Modem
From the My Internet Connect App
Don't want to use the app? You can do it in your web browser.
- Open the My Internet Connect App and tap Settings.
- Under Network Management, select Wi-Fi settings.
- By default, Band steering will be toggled ON, and you'll see one set of Wireless settings which will be applied to both the 2.4GHz and 5GHz Wi-Fi networks.
If Band Steering is turned OFF, you will see separate 2.4GHz and 5GHz settings, and your devices will not automatically switch between the 5GHz/2.4GHz Wi-Fi networks depending on the best available signal. - Make sure that Enable Wi-Fi or the 2.4GHz and 5GHz options are toggled ON.
- On this pages, you'll also find the Wi-Fi name and Wi-Fi password.
- If you made any changes, click Save then Change to finish.

From the Modem Dashboard
- Open your web browser and go to: https://192.168.1.1
- Log in with the Login Password found on the modem's barcode sticker or use your custom password.

- From the left pane, click Wi-Fi.
- By default, Band Steering will be toggled ON, and you'll see one set of Wireless settings which will be applied to both the 2.4GHz and 5GHz Wi-Fi networks.
If Band Steering is turned OFF, you will see separate 2.4GHz and 5GHz settings, and your devices will not automatically switch between the 5GHz/2.4GHz Wi-Fi networks depending on the best available signal. - Make sure that Wi-Fi Enable is toggled ON.
- Make sure that MLO Enable is toggled ON.
This feature allows devices to use multiple frequency bands for better performance. - Make sure that Hide SSID is toggled OFF. If the SSID is hidden, then your Wi-Fi network name(s) won't show up in the list of available networks when you try to connect.
- If you made any changes, click Save to finish.

Basic Wi-Fi settings on a Nokia FastMile 3.2 5G Modem
Note: The Enable Single SSID (band steering) feature can't be managed in the Nokia Wi-Fi app.
- Open your web browser and go to: https://192.168.1.1
- Log in with your default username "admin" and the default password is on your modem's barcode sticker. If you have custom login details, use those instead.

- Hit Network.
- Select Wi-Fi Networks, then 2.4GHz.
- Make sure that Enable Wi-Fi 2.4GHz is ON.
- Make sure that Enable Single SSID and is ON.
If Enable Single SSID is ON, the Wi-Fi names (SSID Name) and passwords (Wi-Fi Key) must match for both 2.4GHz and 5GHz Wi-Fi – this lets devices automatically switch between networks for the best Wi-Fi signal. - If you made any changes, hit Save Changes.

- Next, the same checks need to be made for the 5GHz Wi-Fi network. Select Wi-Fi Networks, then 5GHz.
- Make sure that Enable Wi-Fi 5GHz is ON.
- Make sure that Enable Single SSID and is ON.
- If you made any changes, hit Save Changes.

Basic Wi-Fi settings on a VX220-G2V Modem
-
Open your web browser and go to: https://192.168.1.1
- Log in with the default password found on your modem's barcode sticker. If you have a custom password, use that instead.

-
Select Wireless.
-
By default, Band Steering will be turned ON, and you'll see settings which that apply to both 2.4GHz and 5GHz Wi-Fi networks.
If Band Steering is turned OFF, you will see separate 2.4GHz and 5GHz settings, and your devices will not automatically switch between networks for the best Wi-Fi signal. -
Make sure that Wireless Network - Enable is ticked.
-
Make sure that Hide SSID is NOT ticked.
If the SSID is hidden, then your Wi-Fi name(s) won't show up when you try to connect devices. -
On this page, you'll also find the Wi-Fi Name (Network Name SSID) and Password.
-
If you made any changes, hit Save.

Basic Wi-Fi settings on a VX420-G2V Modem
-
Open your web browser and go to: https://192.168.1.1
-
Log in with the default password “admin”. If you have a custom password, use that instead.
-
Select Wireless.
-
By default, Band Steering will be turned ON, and you'll see settings which that apply to both 2.4GHz and 5GHz Wi-Fi networks.
Note: If Band Steering is turned OFF, you will see separate 2.4GHz and 5GHz settings, and your devices will not automatically switch between networks for the best Wi-Fi signal. -
Make sure that Wireless Network - Enable is ticked.
-
Make sure that Hide SSID is NOT ticked.
If the SSID is hidden, then your Wi-Fi name(s) won't show up when you try to connect devices. -
On this page, you'll also find the Wi-Fi Name (Network Name SSID) and Password.
-
If you made any changes, hit Save.

Basic Wi-Fi settings on a VX420-G2H Modem
-
Open your web browser and go to: https://192.168.1.1
-
Log in with the default password “admin”. If you have a custom password, use that instead.
-
Select Wireless.
-
By default, Band Steering will be turned ON, and you'll see settings which that apply to both 2.4GHz and 5GHz Wi-Fi networks.
Note: If Band Steering is turned OFF, you will see separate 2.4GHz and 5GHz settings, and your devices will not automatically switch between networks for the best Wi-Fi signal. -
Make sure that Wireless Network - Enable is ticked.
-
Make sure that Hide SSID is NOT ticked.
If the SSID is hidden, then your Wi-Fi name(s) won't show up when you try to connect devices. -
On this page, you'll also find the Wi-Fi Name (Network Name SSID) and Password.
-
If you made any changes, hit Save.

Basic Wi-Fi settings on a TP-Link VR1600v Modem
-
Open your web browser and go to: https://192.168.1.1
-
Log in with the default username "admin" and default password “admin”. If you have custom login details, use those instead.
- Select Advanced, then Wireless > Wireless Settings.
- By default, you'll see the settings for the 2.4GHz Wi-Fi network. You can switch between 2.4GHz and 5GHz settings using the tabs in the upper right corner.

-
Make sure that Enable Wireless Radio is ticked for both 2.4GHz and 5GHz Wi-Fi.

-
Make sure that Hide SSID is NOT ticked for either 2.4GHz or 5GHz Wi-Fi.
If the SSID is hidden, then your Wi-Fi names won't show up when you try to connect devices. -
On these pages, you'll also find the Wi-Fi name (Network Name SSID) and Password.
-
If you made any changes, hit Save.

Basic Wi-Fi settings on a Sagemcom 5866
-
Open your web browser and go to: https://192.168.1.1
-
Log in with the default username “admin” and the default password on your modem's barcode sticker. If you have custom login details, use those instead.

-
Select the cog icon on the Wi-Fi 2.4GHz or 5GHz panel.

-
Make sure that Enable Wireless is set to ON for both 2.4GHz and 5GHz Wi-Fi networks.
-
Make sure that Visible is ticked for both 2.4GHz and 5GHz Wi-Fi networks.
If this box is not ticked, then your Wi-Fi names won't show up when you try to connect devices. -
On this page, you'll also find the Wi-Fi names (SSID) and Passwords.
-
If you made any changes, hit Apply.

Basic Wi-Fi settings on a Nokia FastMile R1 5G Modem
-
Open your web browser and go to: https://192.168.1.254
-
Log in with the default username “userAdmin” and the default password on your modem's barcode sticker. If you have custom login details, use those instead.

-
Hit Network, then Wireless (2.4GHz).
-
Make sure that Enable is ticked.
-
Make sure that Enable SSID and SSID Broadcast are both set to Enable.
If SSID Broadcast is disabled, then your Wi-Fi names won't show up when you try to connect devices.
-
If you made any changes, hit Save.
-
Next, the same checks need to be made for the 5GHz Wi-Fi network. Select Wireless (5GHz).
-
Make sure that Enable is ticked.
-
Make sure that Enable SSID and SSID Broadcast are both set to Enable.
-
On these pages, you'll also find the Wi-Fi names (SSID Name) and Passwords (WPA Key).
Important: Make sure the names and passwords match for both 2.4GHz and 5GHz – this lets devices automatically switch between networks for the best Wi-Fi signal. -
If you made any changes, hit Save.

If you suspect your mobile device has been lost or stolen, take action as soon as possible.
In rare cases, you may still have your device but you can’t use it because your mobile number has been stolen through an unauthorised port.
How to report a lost or stolen mobile device/number
You can report a missing device or unauthorised port by giving us a call on 1300 997 273, or +61 2 9007 3023 if you are overseas.
Once you contact us, we can bar your SIM to prevent any unauthorised charges to your account. We can also block your device’s IMEI so it cannot be used with another SIM.
If your mobile number was ported or SIM swapped without your consent, we can reverse the port (and provide a new SIM if necessary).
More info
What should I do before reporting a lost or stolen device?
Before reporting a device as lost or stolen, try calling it. Someone may answer or you might hear it ringing. You should also check whether it’s been handed into your local police station.
You could also try to track the location of the device with:
- Find My iPhone (Apple)
- Android Device Manager (Android)
- My Phone (Windows)
What happens when you bar my service?
When we bar your service, your phone will be unable to make calls except to emergency services. If someone tries to make a call, a recording will advise them that call barring is active on the phone.
Barring your service doesn’t terminate your monthly plan. You can get a replacement SIM card to use with another device.
What if I find the device after you bar my service/block my IMEI?
If you find your device, give us a call on 1300 997 273 and we’ll unbar the service and remove the IMEI block. This can take up to 24 hours to come into effect.
How do I check if a phone has been reported lost or stolen?
You can check if it has been reported lost or stolen through the Australian Mobile Telecommunications Association website and entering the IMEI of the device.
What can I do to deter mobile thieves?
- Keep your mobile out of sight when you're out and about.
- Never leave your mobile unattended.
- Keep a note of your 15-digit IMEI number.
- Use your mobile’s security features such as an unlock PIN, security pattern or thumbprint scanner.
How can someone steal my mobile number in an unauthorised port?
Multi-factor authentication methods protect mobile users from most unauthorised ports. For example, a unique verification code is sent to the affected mobile number before it is allowed to be ported to a new telco or swapped to a new SIM.
A criminal typically needs access to your unlocked mobile phone or other identity documents to complete an unauthorised port. Today, it happens in rare cases of identity theft or fraud.
What else should I do if my mobile number had an unauthorised port?
- Contact your bank or financial institution ASAP and tell them someone might be committing fraud using your details;
- Change your passwords for important accounts like your bank, email and social media;
- Report any fraud to local police or the Australian Federal Police;
- Report any cybercrime involving identity theft or online fraud to the Australian Cyber Security Centre;
- Contact IDCARE on 1300 432 273 if you want help with identity crime or cyber security;
- Report the activity to Scamwatch.
To get started, select your internet type:
- nbn FTTC
- nbn FTTB/N
- nbn FTTP
- nbn HFC
- nbn Wireless
- TPG Fibre to the Home (FTTH)
- TPG Fibre to the Building (FTTB)
Don't know which type of internet you have? Check the email from us about your TPG order.
If you can't get calls on your TPG Voice service, these steps will help you identify the issue.
TPG Voice is a VoIP phone service that works over the internet.
- Is your phone service still new? If it was only ordered recently, we'll send you and email and SMS when it's ready to use.
If you're moving an existing phone number to TPG: After your internet is connected, it can take another 5 days to transfer your number. During this time you'll be make calls using a temporary number, but you won't get calls. -
Is your internet working? Your phone service can't work without internet.
You can check your address for an internet outage or planned maintenance on our Network Status page. - Find your modem and make sure your phone and all cables are plugged in securely and not damaged.
You’ll need to replace any broken or chewed cables. If your phone is damaged, please replace it or contact the seller for a warranty claim.
-
Make sure your phone has power.
Wireless phones may have batteries that need to be recharged or replaced. -
Turn off your modem’s power outlet for at least 5 minutes.
-
Turn the outlet back on and wait for your modem’s Internet light to come on, then see if you can get a call.

-
Still can’t get calls? Use another phone to call us on 13 14 23 or contact us on our Live Chat and we'll help you.
If your Wi-Fi's running slow, these steps will help you identify the issue.
-
Stand next to your modem and run a speed test.
Wi-Fi usually has a range of 30 metres indoors, but this can be reduced by walls and other obstacles between your devices and your modem. -
If your Wi-Fi is only slow in certain parts of your home, check out our guide on improving Wi-Fi signal.
-
If you're using a phone, turn off 4G/5G data to make sure that your phone is using the Wi-Fi, then run another speed test.
-
Your speed may temporarily slow down if you’re running more devices or apps than your connection can handle at the same time. For example, if a device is downloading a large file or running a 4K streaming app, your speed should improve when it’s finished.
If you need to run more devices or apps at the same time, you can change your plan in My Account or call us on 13 14 23 for support. -
Wi-Fi still slow? If you have a TPG modem, please call us on 13 14 23 and we'll help you out.
If you have a third-party modem, please check the manufacturer's website for support.
Here’s how you can set up a compatible bring-your-own (BYO) modem for TPG nbn HFC.
Your nbn Phone service and included calls are not available if you use a BYO modem.
Select one of the links below to jump to a query:
Modem compatibility
To work on TPG nbn HFC, your modem must:
- Be nbn-ready and able to support your nbn plan speed
- Support PPPoE connections by Ethernet WAN
For a list of modems tested by our team, see nbn BYO modem requirements.
General nbn® HFC setup guide for any modem
All modems are different. If this advice doesn’t work for your modem, check the manufacturer’s website for a guide on how to plug in and enter the TPG settings.
- Find your nbn Connection Box (NCB) – this should be connected to your cable wall socket, which may be near another cable wall socket for a cable TV service. Unplug any old modem from the nbn Connection Box and power outlet.
If your NCB is missing, please call us on 1300 023 575. - Use an Ethernet cable to connect your modem's WAN or LAN/WAN port to your NCB's UNI-D1 or 2.5G port.
NCBs with 2.5G ports were supplied from 1 October 2024. - Use the power cable to connect your modem's Power port to a power outlet, then turn it on.
If your modem has a power button or switch, turn it on.
- Connect a device to your modem. You can use an Ethernet cable to connect a device to one of the LAN or Ethernet ports, or connect via WiFi.
The default WiFi name (SSID) and password can be found on your modem’s barcode sticker.
- On your connected device, open your web browser and go to your modem’s gateway address (e.g. http://192.168.1.1). The gateway address and login details can be found on the barcode sticker.
Modems may have a login username and password, or just a password.
- Make sure your modem has the following settings. If you’re not sure how to do this, check the manufacturer’s website for a guide.
Mode/Modulation: WAN
Connection Type: PPPoE
- You’ll need to enter your TPG username and password for the PPPoE connection. Your username is in emails from us about your TPG order, and on your TPG invoice.
If you forgot your password, you can reset it. - Save your settings and wait 5-10 minutes for your modem to connect.
- You should now be online. If you can’t view a website or notice a red or unlit Internet light on your modem, call us on 1300 997 271 for help.
We’re fully trained on TPG modems, but please note that there may be limited support for your BYO modem.
Check the manufacturer's website for a setup guide on how to plug in and enter the TPG Broadband Settings.